Monday, March 29, 2010

herz-jesu kirche

Since last Sunday was Palm Sunday, I'd like to share my "German church" with you, though I went to my "Indonesian church" that day :D

It's a rather small church, and it's always full every Sunday, unlike most of other churches I've been to in Germany. Also, the people coming there are not only old people or young family with small children, but also those who look like students and young professionals.

It's always very lively there, something very rare in German churches. Going there always soothes my longing for my church in Jakarta :)

Friday, March 26, 2010

turkish market and knitting needle head cover tutorial

Do you love traditional markets? I love them.
This week I had the chance to go to one of the famous turkish markets in Berlin at Maybachufer.

There were stands for fabrics, vegetables, fruits, household goods, cheese, meat, and so on. It was also rather crowded, so I couldn't take many pictures, but at least I managed to get the stuff that I needed:

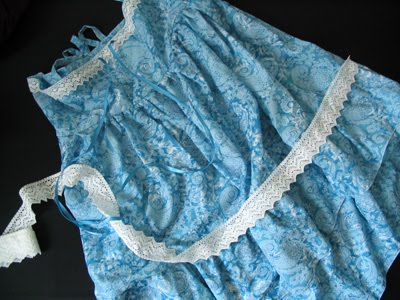
A pair of size 10 (Europe) knitting needles, some sewing thread, zippers and some lace (one of them was needed for my dress). Also, I got myself some of these:

These are called "Sesamringe" (sesame rings) and is one of the most delicious bread in the world - for me, at least :) A pack of 3 rings was sold for €2,00 - cheap and yummy!

Back to my shopping goods - the knitting needles were also very cheap compared to those sold in stores, but the drawback is that they don't look as pretty. So I thought, why not cover the head with something more presentable for the eyes? And since I was in a good mood I thought I could make a tutorial as well!

You'll need:
- a pair of knitting needles
- fabric scraps
- ribbon
- batting
- sewing thread and needle
- glue

1. Cut out two circles from your fabric scraps. Mine had a diameter of 7,5 cm, since the needle heads were pretty big.

2. Do a running stitch along the circle, about 5 mm from the edge. Pull the thread lightly so the fabric forms a cap. Leave the needle on the thread, you'll need it later. You might want to try this half-finished cover on the needle head to see whether it fits.

3. Next, try out the amount of batting you'll need to cover the needle head.

4. Then stuff it into the cap.

5. Now place the whole thing on to the needle head. Last chance for adjusting the placement of the batting inside the cap before sewing everything up!

6. Wind the remaining thread tightly around the base of the cap a few times (did I tell you to use longer thread than you think was needed? well, you do...), then sew up with your favourite finishing stitch.

7. It should look like this now. Carefully trim the fraying edge if needed.

8. Glue a ribbon to cover the base. I'm sorry I couldn't take a better picture, but this is how it's supposed to look like afterwards.

Do the same to the other needle, and you're done!

I did this to my size 10 needle only, so I don't feel the need to put any label to the heads, but if you want to cover different sizes of needles you might want to label them so you can tell them apart. Use stamps, beads, buttons, embroidery, anything!

As usual, please forgive the dark pictures (my next tutorial should not be made at night!), and don't hesitate to contact me if you have any questions!

Thursday, March 25, 2010

my creative space - summer dress

In the last few sessions of my sewing course, I had worked on a summer dress.
I didn't have a pattern for this dress, it's basically assembled from 3 rectangles and a curvy trapezium (it's rather hard to explain...). I used a gather method, so it was a lot of fabric! Also, I couldn't finish the dress in the sewing course, so I had to do the finishing at home, with my mini machine.

This was how my tiny working table looked while I attached the last lace...
...the dress was like a monster, swallowing my whole table!

The finished dress.


Surprise! It can also be worn as a skirt!

Ta-daa!

I'm happy about how it turned out. I was so worried I wouldn't be able to wear it in summer since I couldn't finish it in the sewing course. Thank goodness for my mini machine!

See more creative spaces at kootoyoo!

Wednesday, March 24, 2010

zur rose

Oh dear, so much life, so little time to blog ;-)
Exactly a week ago I went for a solitary lunch at Zur Rose, a very nice little café near my place. I've been wanting to go there for a long time, so I was glad that I've finally have the time to, and I was not disappointed!

Like many of the cafés in Berlin, Zur Rose has a vintage interior, using unmatched vintage furnitures and vintage wallpaper.

The food is super delicious! I had some macaroni with chicken fillet and home-made tomato pesto. Unlike many other places, they don't just give you some cold bread, but ask whether you would like some and then warm them for you. They also have free water, definitely a plus in Germany, where you sometimes even have to pay €0,50 for tap water!

Zur Rose has definitely passed the test to be one of the cafés I'll keep coming back to :)

Thursday, March 18, 2010

my creative space

I made this bag a while ago.
It's going to be my "informal evening bag", so I wanted to give it a subtle accent.
So I browsed through my Japanese craft magazines and came up with a lace brooch.

In progress: 1st layer

In progress: 2nd layer

Now just pin it on the bag! :)

Visit more creative spaces on kootoyoo!

Wednesday, March 17, 2010

carbon neutral

image source: kaufda.de

Just now I came across this campaign "My blog is carbon neutral" - a way for bloggers to help the environment. It started in Germany by the Mach's grün! (Make it green!) programme with the goal of reducing carbon dioxide emissions. By joining this campaign, Kaufda will plant a tree for your blog and thereby neutralise your blog’s carbon emissions for the next 50 years.

So that's the idea. Will you join us?
Every tree counts!

Monday, March 15, 2010

lomography

Last Saturday I went to lomography, at Friedrichstraße 133.
Very cool shop, definitely a must for every lomography/photography fan!


Though they sell チェキ cameras on their online shop, for some reason they don't have them in the shop. But they do have the チェキ films!

Now I really can't wait to get the camera :)


Friday, March 12, 2010

lemon gift bag

This is what I did for my friend Sa-Su's birthday.

This is the present, a shower gel from L'OCCITANE.

I wanted it to have a special packaging...

...so I made this simple lemon drawstring bag!


I made the bag with this mini sewing machine. Look at how small it is!
It can only sew a normal stitch, no interlocking whatsoever. Just straight through.
This is the only sewing machine I currently use until I get a "real" one someday soon :)

Sunday, March 7, 2010

a long, expensive day

Yesterday was a sunny day, though pretty cold.
I started what turned out to be a long, expensive day at around 13:15.
At first I went to check out a few shops in Prenzlauer Berg area, and I met this handsome guy.

Aren't you cold, honey?

After that I was going to watch Avatar with a friend, but since there was still time I went to Manolo for a glass of hot white chocolate - which is actually melted white chocolate in milk, yumm...They have cool interior:

I love glasses with this shape ♥

Then there was the movie, in 3D, which costed us €14 each...
It was the most expensive movie I've ever gone to - at least it was worth it!
Next, dinner at El Reda, a Lebanese restaurant where we had some Kubideh, one of my favourite dishes.


Last, we went for some beer at Eschenbräu brewery.

It's common to see these machines inside a brewery in Germany.

The beer coasters have picture of the brewery's owner on them :)

It was really an expensive day, but I had a good company and a lot of fun, so it was worth it!